
How to Make Natural Yoghurt – no yoghurt maker
Do I need a yoghurt maker to make home made yoghurt? NO! You don’t need a yoghurt maker to make natural yoghurt at home. All you need is something to stand the yoghurt container into to keep it warm overnight. The bacteria need a continuously warm environment to multiply and thicken into a delicious-tasting yoghurt.
Milk
As adults, we are not equipped to digest milk. Milk is food for babies not adults, we lose the enzyme lactase which digests the lactose in milk, around the age of 5 years old. Lactose from milk sits in the digestive tract and ferments, causing what some refer to as lactose intolerance. There is too much consumption of milk in the modern world. It is used in all sorts of processed foods, often in powdered form, you can even find it added to some vinegars sold in shops – always read the label! So let’s get back to yoghurt.
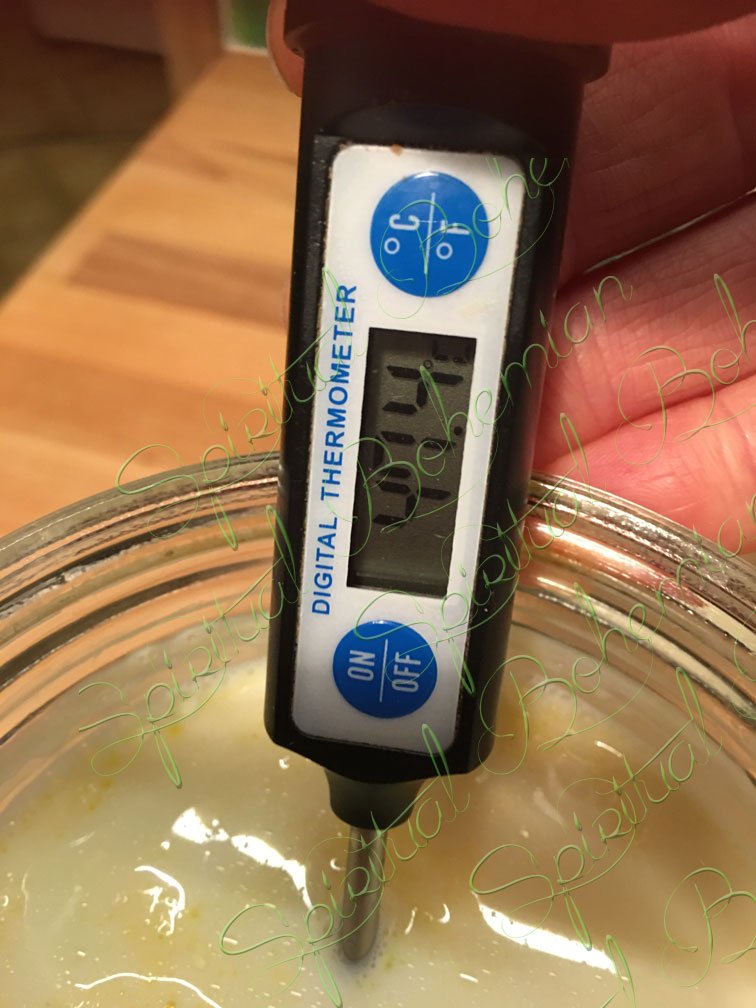
We don’t need milk for calcium, this is a myth too and I’ll cover that in another post. So when we ferment milk to make yoghurt, the bacteria help reduce the amount of lactose and makes it more tolerant for adult consumption. The most delicious yoghurt you can make is from organic farm fresh full fat milk from grass fed cattle of course. It is possible to use pasteurised or ultra heat treated (UHT) but you won’t get the same result. I have experimented with lots of different temperatures when adding the yoghurt starter and have found 45C/116F to be the optimum giving me the best results. Here is how I make my home made yoghurt without the use of a yoghurt maker.

Recipe & Method
You will need:
1 liter farm fresh organic whole fat milk. I buy mine from the local farm – I know we are so lucky. If you really can’t get farm fresh, get fresh pasteurised organic or UHT organic. They are treated slightly different when making yoghurt and won’t produce the same result but if that’s all you can get then go for it.
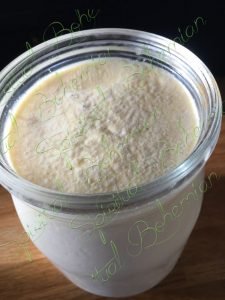
Mason jar or other container to put your milk mixture into overnight. I prefer glass, and find the mason jars were perfectly.
Something to stand your (preferably glass) container into so you can wrap it up and keep warm. I use an old microwave bowl, a piece of thermal fabric (you can use a flask but I got inconsistent results and trying to get the yoghurt out was a nuisance) and towels to cover the whole thing to keep warm overnight.
A tablespoonful of left over natural yoghurt or 2Tbs whey. If you don’t have these, you can either buy some organic natural yoghurt as your starter or buy a sachet of natural yoghurt bacteria. Either way you will need to innoculate (add a yoghurt starter) to the milk to make yoghurt.
Thermometer
Step 1 – Take your fresh unpasterised milk, and heat gently to 180F or 82C. You can do this in the microwave (mine is a 850W). I start with 2 x 3 minutes on medium, then 2 minutes medium. Check temperature. As I get closer to 180F/82C I reduce the time to 1 minute then 30 second intervals. No microwave? Use a pan on the stove. Heat gently and stir frequently. This step will kill off competing bacteria and denature the whey proteins to help give you a thicker yoghurt. If you are using pasteurised or UHT you can skip this step.


Step 2 – Put the hot milk aside to cool. I usually heat my milk in the morning and make the yoghurt in the evening (I reheat to 45C/116F). Not required for pasteurised or UHT.
Step 3 – Take your tablespoon of yoghurt and place in a small dish. When your milk is below 50C/122F, take a tablespoon and mix with the yoghurt to thin it out. This makes it more likely to spread evenly when you add it to your milk. If using UHT or pasterised just mix a tablespoon in with the yoghurt at this stage.

Step 4 – When your milk is at 45C/116F (either cooled or you can reheat), place the container into your “yoghurt maker” container. Add the starter and stir well. Place the lid on the jar, wrap your jar and cover with (2) towels. I use 2 towels in winter because it’s colder but in summer you can usually get away with 1.


Step 5 – Leave overnight (at least 12 hours) and let the bacteria multiply, leaving you with a beautiful thick rich yoghurt. After I have unwrapped in the morning, I put the jar straight in the fridge for at least an hour or so before using.
FAQ’s
How long with home made yoghurt last in the fridge? In optimal conditions it can last for weeks*. What will happen is that bacteria will continue to multiply slowly and you will find that the taste will change to a much more “tangier” or “sharp” flavour. You are perfectly safe to leave it 1-2 weeks, mine only lasts 4 days! (*The only caveat I would add, is that your jar is not sterilised and so bacteria in the airspace above your yoghurt can multiply and effectively start to grow mold).
Can I add fruit to my yoghurt? You can add fruit to your yoghurt but I would recommend you do this after the yoghurt is made and has set up in the fridge for a couple of hours. Adding fruit will limit the life of your yoghurt a bit because the fruit itself can go rancid. I prefer to use my yoghurt on fruit so I can have different fruit every time.
My yoghurt didn’t set. There could be a couple of reasons for this. It could be the temperature was not maintained long enough for the bacteria to grow and therefore thicken your yoghurt. You could also try increasing the amount of starter. If you were using pasteurised or UHT milk, you will find that the yoghurt will be thinner.
My yoghurt separated and looks like grainy cottage cheese – The most common cause of this is the milk was too hot when starter was added. Try reducing the temperature of the milk by 1 degree and see what the results are like.